
Pip the Penguin
A Beginner Crochet Kit by KnotHaven
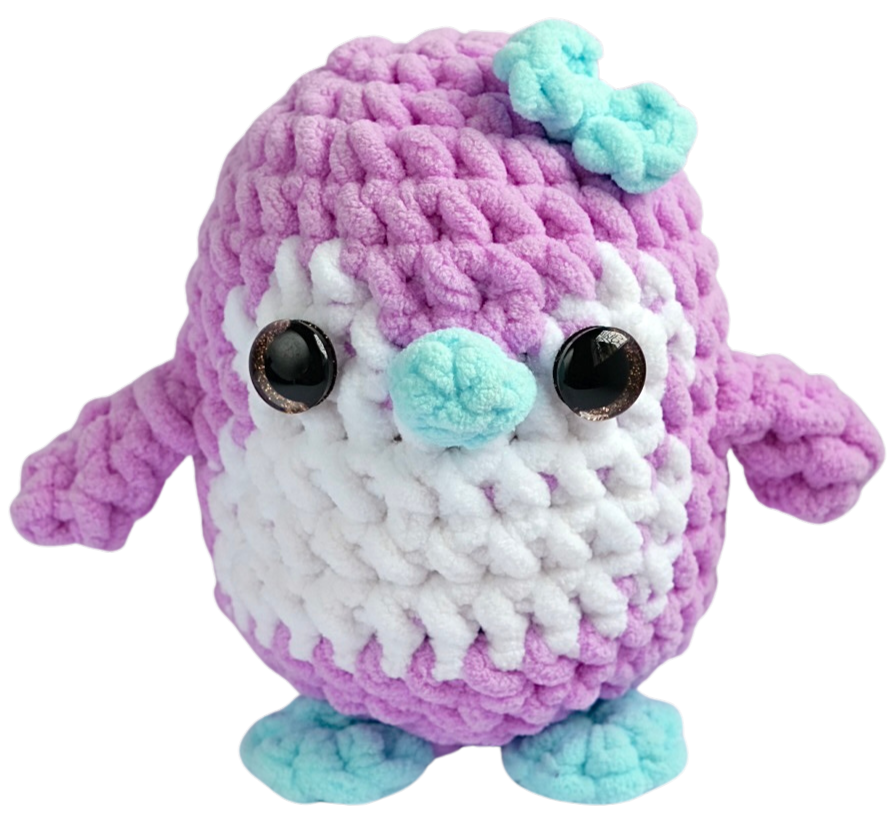
Pip is a playful little penguin who loves waddling through snowy adventures and making new friends. She's full of personality and always ready to keep you company while you crochet.
With her soft purple feathers, tiny blue feet, and fluffy bow, Pip is a great first plushie project for a brand-new crocheter.
She's been thoughtfully designed so that every step feels clear, manageable, and - most importantly - enjoyable.
She can't wait to meet you. Let's bring her to life!
At a glance

Skill level: Beginner-friendly - no prior experience required.

Estimated time: Around 4-6 hours, best spread over a few sessions. Everyone works at their own pace - take all the time you need.

Finished size: Approximately 4.7 inches tall.
What you’ll learn
By the time you finish Pip, you'll have learned five essential crochet skills:
The magic ring - the starting point for almost every amigurumi
Working in the round - how to crochet 3D shapes in a continuous spiral
Color changing - how to switch yarn colors mid-round for Pip's tummy
Shaping with increases and decreases - how to make Pip round and pudgy
Sewing pieces together - how to assemble your finished pieces into one little penguin
Don't worry if these sound unfamiliar - you'll learn each one step by step as you go through the pattern, with video support every step of the way.
What's in your kit
Everything you need to make Pip is included in your KnotHaven kit. Here's what you'll find inside, and what each item is for:
 Purple, white and blue yarnAll the yarn needed to crochet Pip.
 2 x safety eyesPip's eyes, including the small locking backs.
 Crochet hookYour main tool for making every stitch.
 Yarn needleFor sewing the pieces together and weaving in tails.
 Polyester stuffingTo fill Pip's body and give her shape.
 Stitch markersSmall clips to help you keep track of your rounds.
 You'll also need a pair of scissors nearby, to cut your yarn at the end of each piece.
Tip: Before you start, lay everything out so you can see it all. Knowing where each item is will make the process much smoother!
How to use this pattern
Make all the pieces first, then assemble.
Crochet the Body, Nose, Wings, Feet, and Bow separately (two Wings and two Feet). Once all seven pieces are complete, sew them together.
Watch the videos as you go.
Every pattern page links to the exact Crochet Foundations tutorial for each technique, and any bold term is explained there step by step.
Read each section before you begin.
This helps you understand what's coming next.
Place a stitch marker in the first stitch of each round.
This helps you keep track of where each round begins and ends.
Use each page's checkpoint before moving on.
It shows exactly what your work should look like at that point.
Check your stitch count after every round.
Make sure it matches the number shown before moving on.
Experienced crocheter?
Head to the Abbreviated Instructions page for a compact version using standard abbreviations.
Before you start, keep these tips in mind:
Crochet terms you'll learn
Don't worry if any of these sound new - you'll pick them up step by step with the tutorials in the Crochet Foundations section on the website. This glossary is a reference whenever you need it.
Show all crochet termsHide crochet terms
Amigurumi - the Japanese art of crocheting small, stuffed characters. The word comes from ami (crocheted) and nuigurumi (stuffed toy). Pip is an amigurumi!
Chain (ch) - a basic crochet stitch often used to begin a project or create details.
Color change - switching from one yarn color to another while crocheting. You'll do this to create Pip's white tummy.
Decrease (dec) - joining two stitches together into one to make your piece narrower.
Double crochet (dc) - a taller stitch used to make the Bow. It's slightly trickier, but the video tutorial will walk you through it.
Fasten off (FO) - cutting the yarn and pulling it through the final loop to secure your work.
Front loops - the front loop of each stitch - the strand closest to you as you work.
Increase (inc) - crocheting 2 stitches into the same stitch. This makes your piece wider.
Locking back - the small plastic disc that snaps onto the post of a safety eye from inside your work, locking it permanently in place.
Magic ring (MR) - a starting method for crocheting in the round. You crochet into an adjustable loop, then pull the yarn tail tight to close the center hole.
Plushie - a soft, stuffed toy - which is exactly what Pip is! Amigurumi is a type of plushie made using crochet.
Round - one complete circle of stitches when crocheting in the round.
Safety eyes - plastic eyes made up of three parts: a clear outer dome (with a post on the back), a colored disc (the iris), and a locking back. Check placement carefully before securing - they're hard to remove once on.
Single crochet (sc) - the main stitch used throughout this pattern. Short, neat, and ideal for amigurumi.
Slip stitch (sl st) - a small joining stitch used to close rounds or shape pieces.
Stitch marker - a small clip used to keep track of the first stitch in each round.
Stuffing - soft filling placed inside amigurumi pieces to give them shape.
Weave in - hiding yarn tails by threading them through nearby stitches so they're secure and invisible. You'll do this at the end of each piece.
Working in the round - crocheting in a continuous spiral to build 3D shapes. This is the main method used throughout this pattern.
Yarn tail - the loose end of yarn left after starting or finishing a piece.
Two last things before you start
Go slowly.
Taking your time builds better habits and a neater finish.
Mistakes are part of learning.
Every experienced crocheter has had wonky rounds - so keep going.
Grab your yarn and hook, and let's get started - every stitch brings you closer to something wonderful.